Hello,
Today I'd like to demonstrate how I usually create my blurry abstract seascapes and forests. I am totally fascinated by soft smooth surfaces, so a few years ago I started using Photoshop's motion blur tool and the radial blur to soften parts of my photos. If properly used this goes beyond the shallow effect and can add to the overall feeling of a picture. Hopefully I achieved this with some of my works, but it is sometimes a quite difficil undertaking.
To show you how I technically achieve this, I chose the following photo of a rock on the beach of Puerto Naos on the island of La Palma:
Please move your mouse over the picture to see the before/after effect!
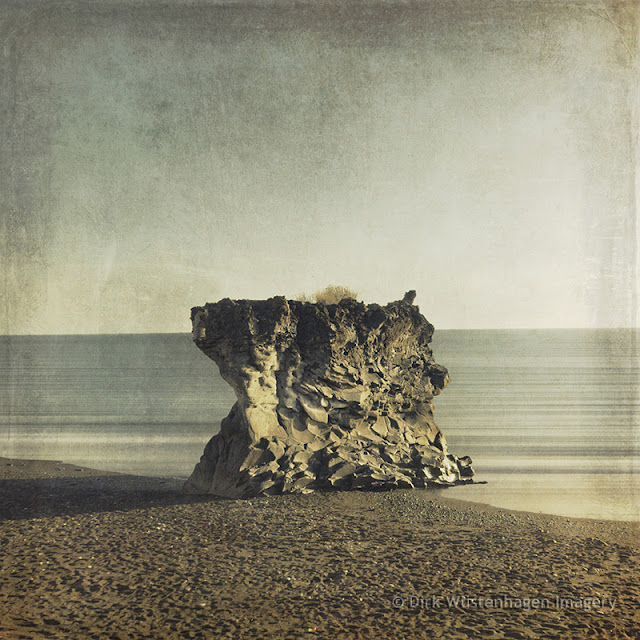 |
| Square Rock Puerto Naos |
|
|
|
|
Preparing the original file
The original RAW-file was quite dark, so I had to some adjustments in Lightroom. I also played around with the colors and was quite happy with the slightly muted vintage tones I got. Before I exported the image to Photoshop, I made a square crop and still wasn't quite shure what to do with the picture.
Manipulate it by adding clouds, grungy textures, birds....?
Instead I opted for smooth water, because I didn't like the water's texture.
Blurring the water
It is quite essential to achieve an exact selection of the area that you want to blur. In this case it was easier to select everything around the water than the water itself. I am lazy, so I used PS Quick Selection tool. After adjusting the selection (soft borders / round edges) I inverted the selection.
Now I had the water selected and hit "CMD J" and got a new layer (no 3 called "water blur") with only the water.
I went to filters-blur-motion blur, chose 0° angle and the highest blur setting and the water went from fine ripples to smooth surface.
Unfortunately this didn't do the trick, although I used a layer mask to cover the non-sea parts.
The blur didn't cover the edges of the rock which looked quite ugly:
I had the idea to copy the backgound layer and applied the motion blur on the whole picture. As I only wanted the water to be blurry, I again used a layer mask to show only the water and finally got what I wanted.
Texturizing
I felt that the picture could use some additional textures to make it look even more vintage. Tones and structures of two textures from the
Spring Release Texture Pack seemed to be perfect for this. As you can take from the layers picture I had not much to do until I was satisfied with the result.
Only one layer in Multily mode and the other in Overlay to get more contrast.
I finished the whole with some light and contrast adjustments using the curves tool.
That's all!
Thanks for reading!
Dirk


Great technique!
ReplyDelete