How To Create Minimalistic Landscapes Using Blur Filters in Photoshop
For at least 10 - 15 years I love creating abstract minimalistic landscapes such as beach and forest scenes in my post processing of photos using a range of Photoshop's blur filters.
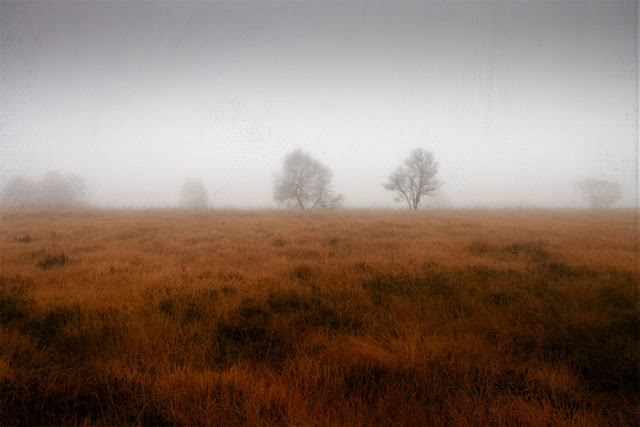
Here's one of my latest images that features this (and other) techniques:

The original photo was taken almost 15 years ago with a 7 megapixel Canon Camera, but I wanted to challenge myself and try to make more interesting image out of it.
Start
I came across this image while browsing through my photo archive and kind of liked the scene with the woman enjoying standing in or close to the surf.

Editing Steps
1. I expanded the image from its 4:3 ratio to a square format making the added part transparent. Then I selected the blue sky and erased it. As I knew I wanted to create an abstract image I searched for a cloudy sky and found a suitable photo in my library, that would make a more interesting sky than a bland blue one.
I positioned this sky a layer under the beach photo and got this:

+

=

2. Working on Colours
I decided to work on the colours first. I didn't have a specific look in my mind that I was going for, so I started playing around with the tools at hand in Photoshop. I created the overall look by using the ColorLookup Adjustment in PS, in this case Fuji F125 Kodak 2395. I then intensified the blue and cyan tones as well as the tones of the sandy beach. I also enhanced the contrast with the help of a curves adjustment layer.


I hope you found this interesting and if you have any questions, don't hesitate to contact me.

3. Motion Blur and Path Blur Effects
Before I used the blur filters I selected the woman and made a copy of here on a separate layer. I also got rid of the person and the hole/ shadow in the sand using the Spot Healing Brush Tool
I then went to the Filters menu and decided tu apply a path blur first.

The blue lines show the actual path
- the sand/ beach from left to right and the horizon also in a straight line in that direction, which helps to separate the two main blur paths. The sky was created from left to right and then back.
In a second step I added a motion blur effect (quiet strong 1125 px) which resulted in the final blur - scape:

All I now had to do was to make the layer with the woman visible and my image was finished.
I created a layer animation video, which nicely illustrates the development of the image edit:
Thank you!

This is a beautiful breakdown of creating minimalistic landscape edits — I especially like how you explained the use of negative space and color harmony. Your tips have inspired me to try a new workflow for my real estate imagery too!
ReplyDeleteIf anyone is interested in additional editing techniques and presets for property photos, feel free to check out phephotos for more ideas and samples. Keep up the great work! https://phephotos.com/